Sell event tickets
Varyshop Events provides users with the ability to create custom event tickets (and ticket tiers), with various price points.
It also allows them to sell event tickets in two different ways: via standard sales orders, and online through an integrated website.
Varyshop also simplifies the ticket-purchasing process by providing plenty of payment method options.
Tip: To learn more about how to create custom tickets (and ticket tiers) for events, check out the Create events documentation.
Configuration
In order to sell event tickets in Varyshop, some settings must first be enabled.
First, navigate to Events app > Configuration > Settings. In the "Registration" section, there are two different settings: "Tickets" and "Online Ticketing".
The "Tickets" setting allows users to sell event tickets with standard sales orders.
The "Online Ticketing" setting allows users to sell event tickets online through their integrated Varyshop website.
To activate a setting, tick the checkbox beside the desired feature's label, and click "Save" to finish enabling it.
Note: If these options are not enabled, a default "Register" button becomes available for visitors to interact with and procure free registrations to the event.

With those settings enabled, Varyshop automatically creates a new Product Type called, Event Ticket, which is accessible on every product form. Varyshop also creates three event registration products (with the Product Type set to Event Ticket) that can be used or modified for event tickets.
Important: When creating a new event registration product, the Product Type must be set to Event Ticket on the product form, in order for it to be selected in the Product column under the Tickets tab on an event form.

Note: Any event with paid tickets sold, features a "(Sales)" smart button at the top of the event form, where the respective sales orders attributed to those ticket sales become available.
Clicking the "(Sales)" smart button reveals a separate page, showcasing all the sales orders (standard and/or online) related to tickets that have been sold for that specific event.

Sell event tickets with the Sales app
To sell event tickets with sales orders, start by navigating to the Sales app. Then, click "New" to open a new quotation form.
After filling out the top portion of the form with the appropriate customer information, click "Add a product" in the "Order Lines" tab. Then, in the "Product" column, select (or create) an event registration product configured with its "Product Type" set to "Event Ticket" on its product form.
Once an event registration product is selected, a "Configure an event" pop-up window appears.

From the "Configure an event" pop-up window, select to which event this ticket purchase is related to in the "Event" field drop-down menu. Then, in the "Event Ticket" drop-down menu, select which ticket tier the customer wishes to purchase, if there are multiple tiers configured for that event.
When all the desired configurations are complete, click "Ok". Doing so returns the user to the sales order, with the event registration ticket product now present in the "Order Lines" tab. The user can proceed to confirm and close the sale, per the usual process.
Tip: To re-open the Configure an event pop-up window, hover over the event registration product name in the "Order Lines" tab, and click on the "(pencil)" icon.
Sell event tickets through the Website app
When a visitor arrives on the register page of the event website, they can click the "Register" button to purchase a ticket to the event.
Note: If the visitor is not already on the register page of the event website, clicking "Register" on the event website's submenu redirects them to the proper register page. From there, they can click the "Register" button to begin the ticket purchasing process.
If different ticket tiers are configured for the event, the visitor is presented with a "Tickets" pop-up window.
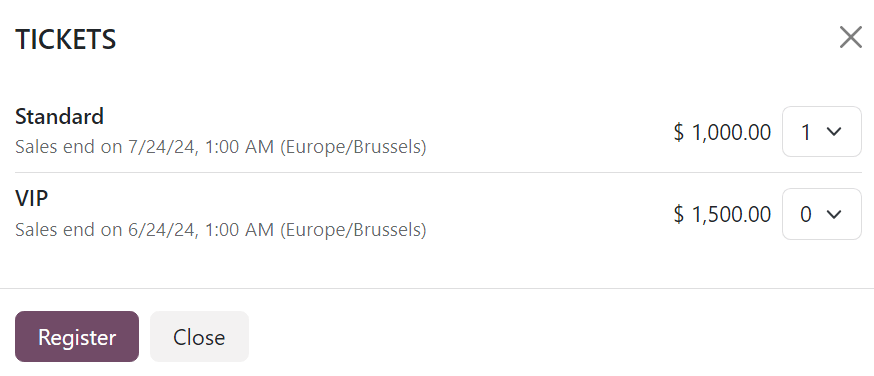
From here, visitors select which ticket tier they would like to purchase, along with a quantity, using the numerical drop-down menu available to the right of their desired ticket. Once the desired selections have been entered, the visitor then clicks the "Register" button.
Then, an "Attendees" pop-up window appears, containing all the questions that have been configured in the Questions tab of the event form for this particular event.
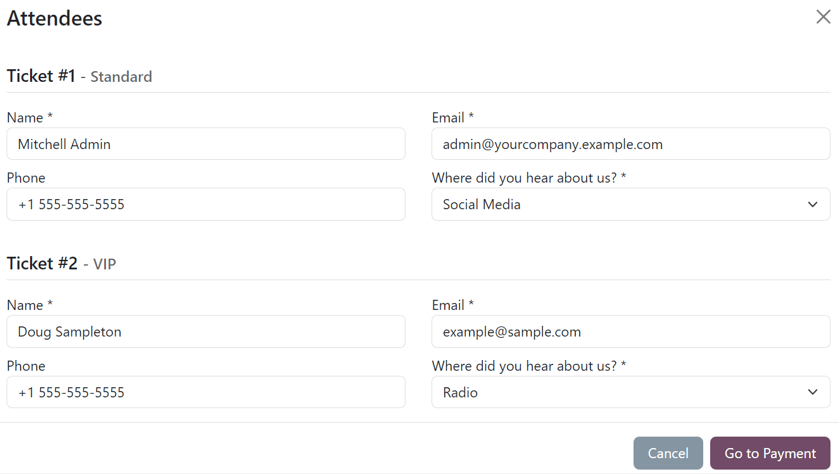
If multiple tickets are being purchased at once, there are numbered sections for each individual ticket registrant, each containing the same questions. However, if any question has been configured with the Ask once per order setting, that question is only asked once -- and not for every attendee making the reservation in the order.
With all necessary information entered, the visitor can then click the "Go to Payment" button. Doing so first takes the visitor to a "Billing" confirmation page, followed by a "Payment" confirmation page, where they can utilize any configured payment method set up in the database to complete the order.
Then, once the purchase is complete on the front-end of the website, the subsequent sales order is instantly accessible in the back-end of the database.
See also: Create events